Mastering CI/CD: A Step-by-Step Guide to Seamless Integration of GCP's Cloud Build with GitHub


Google Cloud Build
Google Cloud Build is a fully managed, serverless CI/CD (Continuous Integration/Continuous Deployment) platform provided by Google Cloud. It simplifies the process of automating builds, testing, and deployment of applications. Cloud Build offers several advantages, including:
Ease of Use: Cloud Build seamlessly integrates with popular source code repositories like GitHub and offers a user-friendly interface.
Serverless and Scalable: It eliminates the need to manage infrastructure and automatically scales to accommodate your workload.
Security and Isolation: Each build runs in an isolated container, ensuring security and preventing conflicts between builds.
Cost Efficiency: You only pay for what you use, without any fixed infrastructure costs.
Fast Builds: Leveraging Google Cloud's infrastructure, builds are typically fast and suitable for projects of all sizes.
Customizable: You can define custom build steps and workflows using configuration files, supporting various languages and frameworks.
Integration with GCP Services: Cloud Build can easily integrate with other Google Cloud services, such as Google Kubernetes Engine (GKE), Google App Engine, and Google Cloud Functions, allowing you to create a complete CI/CD pipeline.
Google Cloud Run
Google Cloud Run, on the other hand, is a serverless container platform that allows you to deploy and manage containerized applications quickly. It automatically scales your containers and manages the infrastructure, making it an excellent choice for running stateless applications.
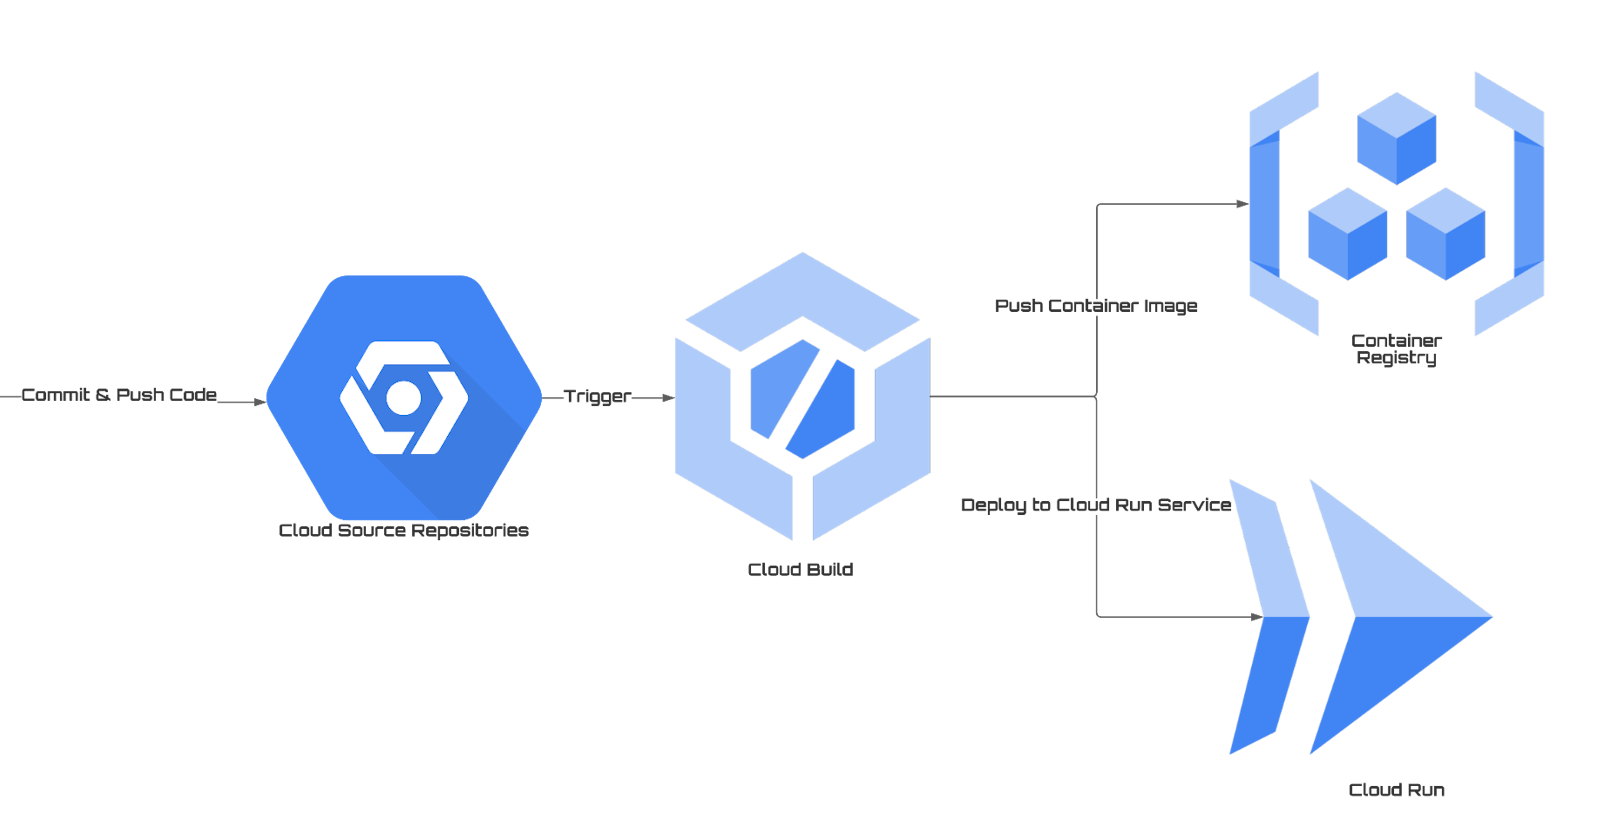
In this extended tutorial, we will guide you through setting up Google Cloud Build to automatically build and deploy your containerized Python application to Google Cloud Run whenever code changes are pushed to your GitHub repository. By the end of this tutorial, you'll have a streamlined CI/CD pipeline that not only builds your application but also deploys it to Cloud Run.
Prerequisites:
A Google Cloud project.
An existing code repository on GitHub, such as https://github.com/Akhil120/gcp-app.
Step 0: Fork the GitHub Repository
Before you proceed with the tutorial, you'll need to fork the source repository into your own GitHub account. Follow these steps:
Visit the source repository on GitHub: https://github.com/Akhil120/gcp-app.
In the upper-right corner of the repository page, click the "Fork" button.
Select your GitHub account or organization where you want to fork the repository.
Wait for the repository to be forked into your GitHub account.
Now you have a copy of the source repository in your GitHub account, and you can follow the tutorial using your forked repository as the source.
Please ensure that you replace references to the source repository URL with your forked repository's URL when following the tutorial.
Step 1: Enable Google Cloud Build API
Before you can use Google Cloud Build, make sure the Cloud Build API is enabled for your project. To do this:
Go to the Google Cloud Console.
Select your project (or create a new one).
In the left sidebar, navigate to "APIs & Services" > "Library."
Search for "Cloud Build API" and click on it.
Click the "Enable" button if the API is not already enabled.
Step 2: Set Up Google Cloud Build Trigger
Now, we'll set up a trigger to automatically build artifacts whenever code is pushed to your GitHub repository.
Go to the Google Cloud Console.
Select your project.
In the left sidebar, navigate to "Cloud Build" > "Triggers."
Click the "Create Trigger" button.
Fill in the trigger configuration:
Name: Enter a name for your trigger.
Description: (Optional) Provide a description.
Event: Choose "Push to a branch."
Source: Select "GitHub" as the source repository.
GitHub App: Click the "Connect Repository" button to link your GitHub account.
GitHub repository: Select your existing GitHub repository, such as "your-github-username/gcp-app."
Included Branch: Specify the branch you want to trigger the build on.
Build Configuration: Choose "Use a configuration file (YAML or JSON)."
Cloud Build Configuration File: Enter the path to your
cloudbuild.yamlfile, which contains the build steps and configurations for your project. If it's in the root directory, simply enter.cloudbuild.yaml.We have the provided cloud build config in our repository.
Click the "Create" button to create the Cloud Build trigger.
Step 3: Configure cloudbuild.yaml to build and deploy your code
To enable the deployment of your containerized application to Google Cloud Run, you need to add the following config to your cloudbuild.yaml file. Replace the project_id variable accordingly.
# Define variables for project ID, image name, and tag.
# Customize these values as needed.
substitutions:
  _PROJECT_ID: 'upgradlabs-1695429666985'  # Replace with your actual project ID.
  _IMAGE_NAME: 'gcr.io/${_PROJECT_ID}/my-app'
  _TAG_NAME: '0.0.4'
  _REGION: 'us-central1'  # Replace with your preferred region.
  _SERVICE_NAME: 'my-cloud-run-service'  # Replace with your preferred Cloud Run service name.

steps:
- name: 'gcr.io/cloud-builders/docker'
  args: ['build', '-t', '${_IMAGE_NAME}:${_TAG_NAME}', '.']

# Push the Docker image to Google Container Registry.
- name: 'gcr.io/cloud-builders/docker'
  args: ['push', '${_IMAGE_NAME}:${_TAG_NAME}']

# Deploy to Cloud Run.
- name: 'gcr.io/google.com/cloudsdktool/cloud-sdk'
  entrypoint: 'gcloud'
  args:
  - 'run'
  - 'deploy'
  - '${_SERVICE_NAME}'
  - '--image=${_IMAGE_NAME}:${_TAG_NAME}'
  - '--platform=managed'
  - '--region=${_REGION}'
  - '--allow-unauthenticated'  # Optional: Remove this line if you don't want to allow unauthenticated access.

images:
- '${_IMAGE_NAME}:${_TAG_NAME}'  # Reference the dynamic image name and tag.
Here is a brief explanation of what this cloudbuild.yaml file achieves
Build Docker Image: Automatically create a Docker image for your application.
Push to GCR: Store the Docker image in the Google Container Registry.
Deploy to Cloud Run: Automatically deploy the image to Google Cloud Run upon code changes.
For a comprehensive list of other types of cloud builders check Google's documentation here: Cloud builders | Cloud Build Documentation | Google Cloud
Step 4: Test the Trigger
To test your Cloud Build trigger:
Push a code change to the specified branch of your GitHub repository (e.g., https://github.com/your-github-username/gcp-app).
Go to the Google Cloud Console.
Select your project.
In the left sidebar, navigate to "Cloud Build" > "History."
You should see a new build triggered by your Cloud Build trigger. Click on the build to view its details.
In the build details, you can see the build steps and logs and when the build is successful you should see a docker image in your artifact repository built from just a single commit to your source repo.

Step 5: Verify Your Application on Cloud Run
Now that your application is built and deployed automatically, you can verify it on Google Cloud Run:
1. Go to the Google Cloud Console.
2. Select your project.
3. In the left sidebar, navigate to "Cloud Run."
4. You should see your Cloud Run service with the name you specified in the cloudbuild.yaml file (e.g., "your-cloud-run-service"). Click on it.
5. You can access your deployed application by clicking the service URL provided on the Cloud Run tab.

That's it! You've successfully set up Google Cloud Build to automatically build and deploy your containerized Python application to Google Cloud Run whenever code changes are pushed to your GitHub repository. This automated pipeline streamlines your development workflow, making it easier to release updates and improvements to your application while ensuring consistency and reliability in the deployment process.
By following this tutorial, you have achieved a powerful CI/CD setup for your project, utilizing Google Cloud Build for building and Google Cloud Run for deployment. Feel free to customize this setup further based on your specific project requirements.